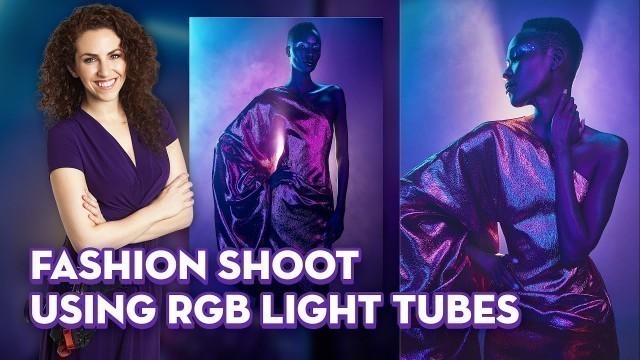

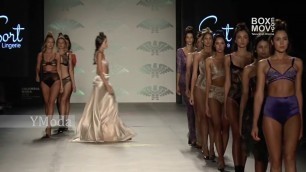
'In today’s Photo Deconstruction I’ll take you behind the scenes of a shoot featuring RGB light tubes. If you follow my work you already know that color is an important part of it, whether it’s used in the clothing, makeup, environment, or lighting. I usually do this with gels, but lately I’ve been falling in love with RGB constant light tubes. The ones I use specifically are from Nanlite and are full RGB LED. I love using these lights because of their versatility. To begin with, they\'re relatively small and unobtrusive so they can be stored easily and travel well. Second, I have a full range of adjustable colors at my fingertips with no fumbling around taking down a light, dismantling the modifier and trying to locate a gel color I might not have. Last but not least, because of the \'quality\' of light they produce which is very cinematic in my opinion. Another reason I really love these lights is because of how bright they are. I don’t necessarily need to shoot wide open or have a very slow shutter speed. What you see is what you get. I crafted this shoot around the light tubes, knowing that I wanted something dramatic and that would emphasize the colors of course. This lead me to the selection of the dress and how I intended to light the model. Now to the lighting. This is a rather complex 5 light setup but each light has a purpose. (BTS: 1:34) Starting with the background light -- a Nanlite Forza 500 with Fresnel which is used to focus the beam of light coming from behind. You’ll also notice the smoke in the scene which was courtesy of my trusty haze machine. The haze machine produces a finer particle which helps to show more of a physical direction of the light. This combo really gave the image that cinematic look I was after. Lights 2 & 3 were back and behind the subject dialed in to be Cyan and give the model a nice rim and over head light. Lights 4 & 5 are in front of the model to the left and right using blue and purple. The end result straight out of camera (6:31) was pretty much the same as the final image, I was really happy with how things came out but it lacked a bit of contrast due to the haze. I made some further adjustments in Capture One and increased the contrast, clarity, highlights, and used Dehaze to get to the final result.
Tags: bts , photography , fashion shoot , photography tips , studio photography , photography lighting , adorama , model photography , Lindsay Adler , model shoot , how to photography , Photo Inspiration , color gel photography , Nanlite , constant light photography , fresnel lens , fresnel modifier , advanced lighting , advanced photography lighting , pavotubes , rgb led tubes , light tubes , constant lights , PavoTube II X LED Pixel Tubes
See also:


comments