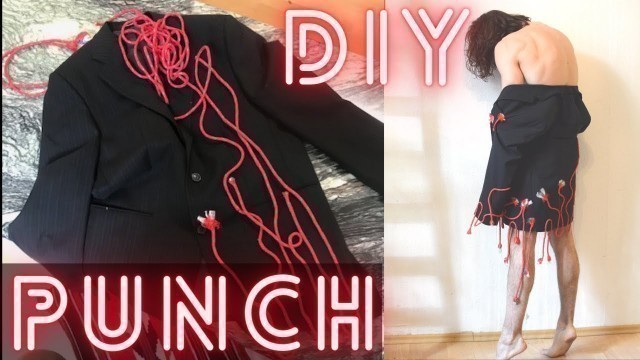

'Welcome to my new channel where we take old clothes and make it fashion. Today I demonstrate how to neeldefelt clothes by using a mix of embroidery and needlefelting on a vintage blazer. SUBSCRIBE FOR WEEKLY UPCYCLING CONTENT http://www.youtube.com/channel/UCsj8jgFfeTB-10Z9pTuXa0Q?sub_confirmation=1 INSTAGRAM https://www.instagram.com/peercox/ My name is Peer Cox, I am a #fashiondesigner and I want to inspire you to think twice before you throw away your clothes. I take mostly vintage or old clothes and make tutorial style #DIY videos. I do sewing projects, try new and traditional techniques in my home and do all kinds of clothing transformations (#thriftflip) that you can learn from for your own projects. Some outfits will be ready to wear to the office but there will also be high fashion almost couture looks and everything in between. So if you are into #fabricmanipulation, #sewing, #redesign or #sustainable avant-garde fashion make sure to follow me on youtube and instagram because I will upload content every week. High-end and sustainable fashion does not have to be boring and can be super luxurious without being wasteful and unaffordable! FEEDBACK & HASHTAG #FASHIONREC I would love to hear your opinion, feedback, tips and tricks or anything you want to share in the comment section. If you are inspired to start a project after seeing my videos or have any upcycling project you want to share, use the hashtag #fashionrec to post it on instagram and I will share the best projects in my stories. TODAYS PROCESS & EXTRA TIPS In my first video I transform a boring Bäumer blazer into a museum-worthy piece. I try a fabric alteration technique that is called #needlefelting. With this simple little tool that contains barbed needles you can merge two different materials together by punching the fibres of the upper #fabric through the bottom fabric. You can also do this technique by machine and in this case it is called punching or needle punching. However, done by hand it is mostly called needle felting and therefore my use of the word is incorrect because when people say #needlepunching they usually refer to the use of another kind of embroidery device, which I will also try in a future video and is linked below. Use a seam ripper to carefully get out the lining just far enough so you can reach the mat and the needle felting tool where you want to apply the technique. When you use a thin fabric like the jacket I use, make sure to stiffen the fabric by applying a layer of iron-on interfacing (vlieseline) on the parts where this is NOT done yet (in my case this was only on the back). This will give a more even result when you apply a heavy weight embroidery. I use a simple (but a bit time consuming) manual embroidery technique with the red rope and a solid yarn with normal stitches that I knot regularly to prevent the rope from loosening. I place the stitches about 2 cm apart so that the rope can still have a little bit of room to not pull to much on the fabric. By fraying the ends of the rope and using the needle felting tool to punch the fibers in, I create a modern looking flower-like embroidery. You can get a little creative here, take different sizes and colors of ropes and make different sizes of flowers. Don\'t forget to first pin and carefully consider the placement before attaching the embroidery with yarns! You can try the garment on a mannequin or yourself (or whoever you are making the project for) to see if the placement is flattering and interesting enough. I choose for a more organic, almost moving looking style, where the flowers run as poppy flowers over the jacket. Punch carefully to not break any needles like I did and use finger protection to make sure you are not injuring yourself! Finally, close the lining by machine or hand to finish off. DISCLAIMER The videos are not about creating the perfect endproduct or a final design that will please everyone: It is about the #creative process, learning new crafts, practicing our skills and having fun! Tastes may differ but I want to raise awareness about #upcycling and sustainability and show all the easy and advanced level possibilities we have available to do fun fashion and art projects at home with a few materials and our used / defective garments. Please use my videos for entertainment and educational purposes only, always take the necessary safety measures and research a variety of sources before starting with a new technique and try to be realistic about your skill-level and the possible risks and results. Sometimes we need mistakes to get to the next level! PRODUCT LINKS (examples, not affiliate and not all tested and tried personally) Needlefelting tool: https://amzn.to/2P5TiIJ Needlefelting mat: https://amzn.to/3k0f3rQ Alternative needlefelting mat: https://amzn.to/2X2yrdK Actual needle punching tool: https://amzn.to/3399O2T Janome punch machine: https://bit.ly/39zp1eW BUSINESS INQUIRIES [email protected]'
Tags: fashion designer , diy , sewing , thrift flip , diy fashion , fashion tips , fashion tutorial , fabric manipulation techniques , NEEDLE FELTING , HOW TO NEEDLE FELT , NEEDLE PUNCHING , EMBROIDERY INSPIRATION , FASHION DESIGNER TRIES , UPCYCLING TECHNIQUES , UPCYCLING FASHION , SEWING PROJECT; , FASHION EMBROIDERIES , HOW TO UPCYCLE VINTAGE CLOTHES , needle felting for beginners , free embroidery design , textile ideas design fashion , fabric manipulation techniques tutorials
See also:


!['#LINGERIE [LYON MODE CITY 2008] EP.4-2|Lingerie Fashion Show 4'](https://cdn-img01.fashiondub.com/images/13-m/143/1435905_m.jpg)


comments